


Hello everyone!
This is a generic guide written for the DPS League designed to help people understand the positioning and skill activation sequence for a standard left to right ISA.
Positioning and skill sequence is probably one of the more complex requirements that can greatly influence the DPS outcome. The other major factor would be team composition.
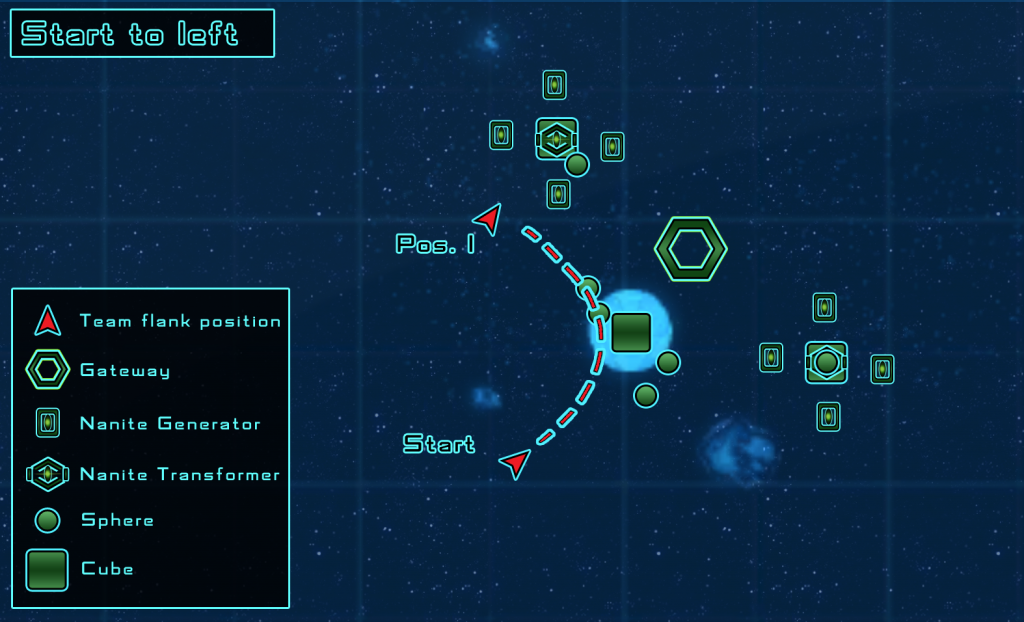
Starting position from an organised run has a countdown started by the host, public runs just start the moment you get in. A 1 second full impulse burst is required to get you into range to shoot the first central group.
 (graphic by @reptilecynrik)
Starting Group:
- A Normal Attack consists of Activating Emergency Power to Weapons, Kemocite, Attack Pattern Beta, Scatter Voller or Fire at Will, then shoot
- optional to use Tac Team to clear boarding parties “after” you start shooting, be advised there is a slight lockout for other skills when using Tac Team and Distribute Shields due to its activation time
- You can also use TAC/ENG/SCI/Intel Fleet but if it’s a random group it might be best to save for the left Transformer
- Once all ships are destroyed, Evasive Manoeuvres to the left Transformer
Left Transformer:
- You want to run on a fairly even longitudinal axis and Hold Position in Front of the Transformer at a distance of 2-3km. Be advised that larger ships have higher inertia and require more practice to avoid excessive sliding
- As you are transiting to the left side (which only takes a few seconds) be prepared to activate your skills
- Broadside for beams, Facing Forward for cannons
- If you are able to call out Fleet Support, now is the best time
- You can now use more potent skills for a Spike Attack in the following sequence, Emergency Power to Weapons=> Tac Initiative=>Vulnerability Sweep=> Energy Amplifier Battery=> Attack Pattern Alpha=> Go Down Fighting=> Attack Pattern Beta=> Kemocite=> Cannon Scatter Volley or Fire at Will, then Shoot
- Substitute Intrusive Energy Redirection for Engineers. You also have the option to use universal console abilities like “D.O.M.I.N.O” and “Dynamic Power Redistributor” if you have them.
- Best to use D.O.M.I.N.O when you have many targets to shoot, and Dynamic Power Redistributor is best saved if you have taken heavy damage as it will restore you to full health quickly and give you a nice damage buff
- There are numerous other universal consoles with abilities you can activate, too many to list, but those are the two most prominent
- Be sure to activate all buffs/de-buffs/weapons enhancements before shooting to ensure you are stacking all your damage potential into a firing cycle
- If your weapons are shooting before the buffs are applied then it may not apply until the next cycle in which you have wasted precious time
- You have to option to use Focused Frenzy on the Transformer, a powerful buff that helps increase damage, speed up firing cycle and recharge skills
- You can use this on either Transformer, Gateway or the Tactical Cube
- Holding position is critical to keep many targets in firing arc, also allows traits like Anchored to build bonus damage stacks, and keeps you in flanking position for the transformer
- If you are taking Excessive damage you can use the Active Reputation abilities like the Quantum Singularity Manipulation (cloak) or the Bio-Molecular Shield Generator or the Sensor Interference Platform
- Optional SCI captains can use Scattering Field and Co-Opted Energy, ENG captains can use Rotate Shield Frequency and Miracle Worker
- Ensure All Generators and Spheres are destroyed before moving onto the next group of Spheres that spawn from Gateway
 (graphic by @reptilecynrik)
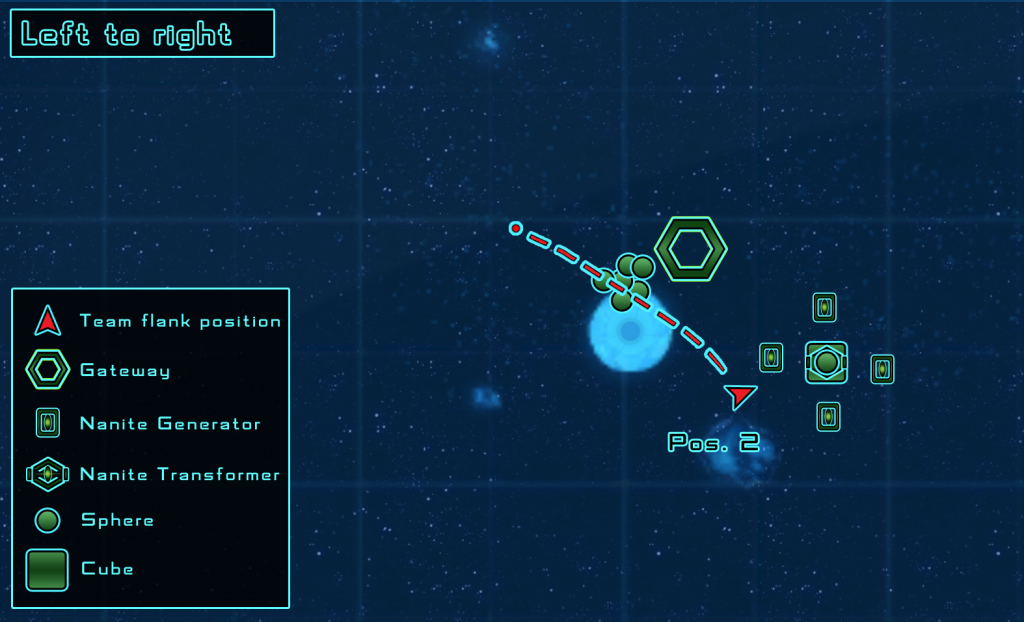
Left Spheres:
- After Transformer, Generators and all Spheres are destroyed, you can transit to a group of Spheres that spawn from the gate. With Tac Initiative and/or an aux2bat build you should have most of your skills recharged, and some may still be running
- Position yourself at a distance of 2-3km from the spheres
- In addition to your attack skills you can also use Active Reputation abilities like Anti-Tme Entanglement, or Refracting Tetryon Cascade, or even use Delta Alliance Reinforcement Beacon
Right Transformer:
- After all Spheres are Destroyed you can Evasive Manoeuvres to Position at right Transformer (I suggest using a conn doffs to reduce evasive cooldown), you can also use a speed boost from the competitive engine, or a deuterium surplus, or Emergency Power to Engines etc.
- The process is mirrored on the right side as you have done on the left
- Position yourself 2-3km in front of the transformer
- Stack your abilities before shooting
- Use an active reputation or special console if you are taking excessive damage
- Ensure All Generators and Spheres are destroyed
- The process is mirrored on the right side as you have done on the left
 (graphic by @reptilecynrik)
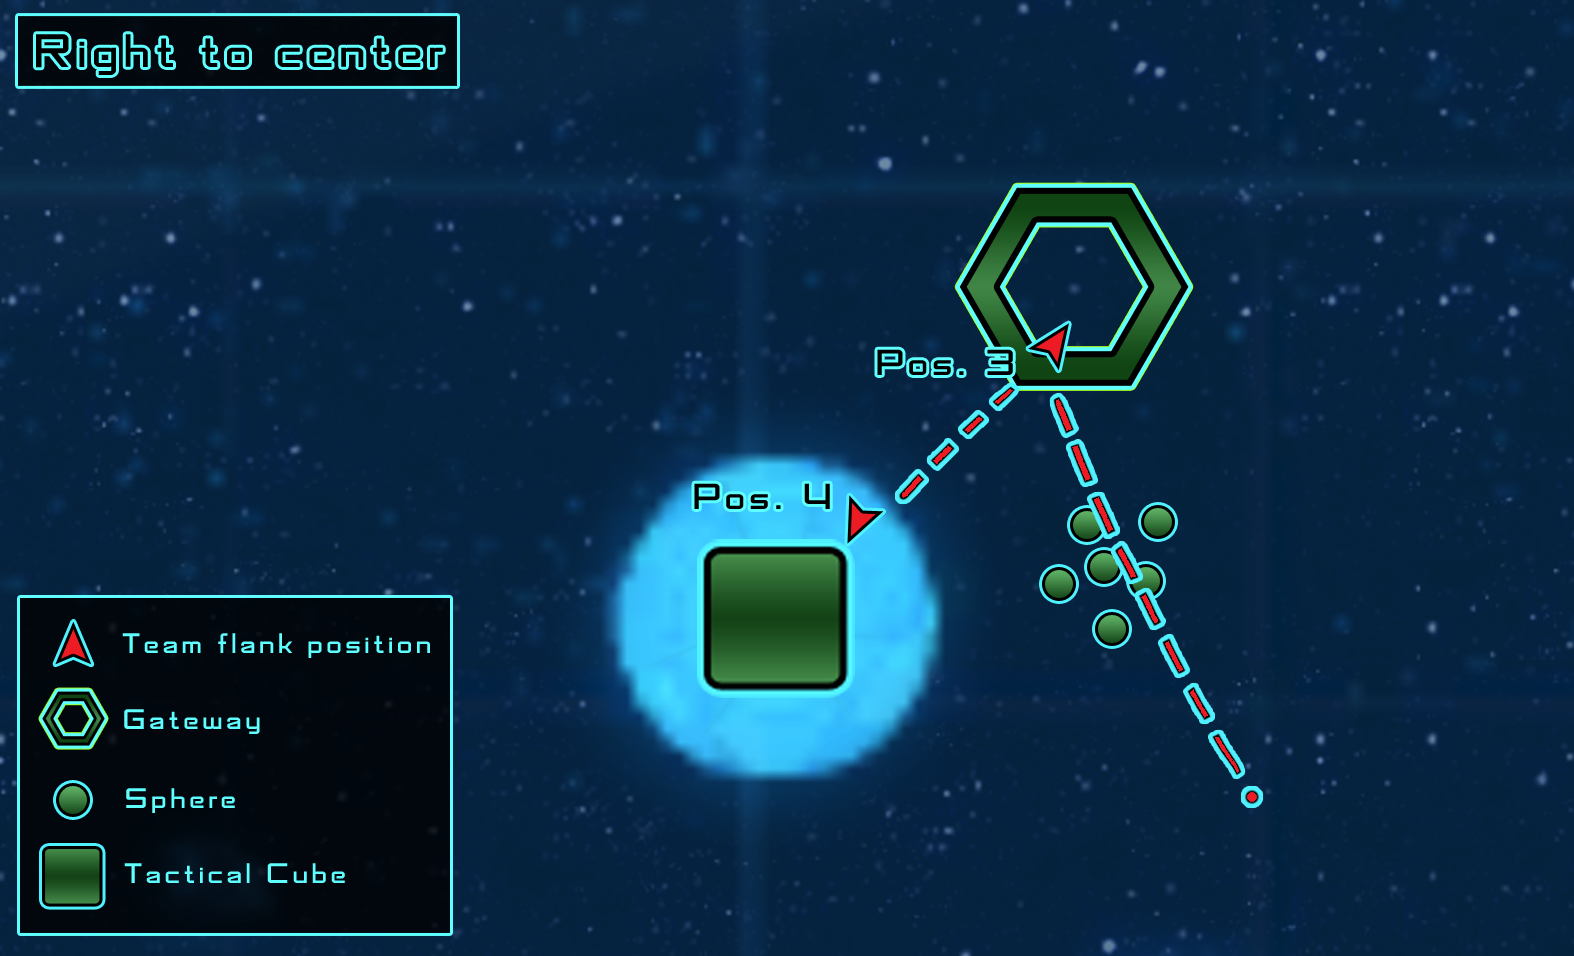
Right Spheres:
- After the right Transformer and Generators have been destroyed you will then have another group of Spheres spawn as they did on the left
- The same as before position yourself to fire at the optimal range
- Stack all Attack abilities
- If you have not used your Anti-Tme Entanglement, or Refracting Tetryon Cascade, Fleet Support or Delta Alliance Reinforcement Beacon then now is the time
Gateway/Tactical Cube:
- After spheres are destroyed position yourself in between the Gateway and the Tactical Cube, that will put you in flanking position for the gate and give you an optimal position to finish the Gateway before turning to finish the Tactical Cube
- There is no holding back on the final targets, use all the Attack abilities you have
For details about ship builds, skill trees, specialisation points and all other factors involved then visit https://www.sto-league.com/ship-builds/ as they have a comprehensive guide to help people find what they are looking for, or perhaps to inspire others to create something new and better.

Good job, Obi!
I like it! I might even learn to fly one of these days so manuals like this are indeed useful. Thank you for putting it together for the community.
Amazing work!
I think the words good job amazing work describe this pretty well. I hope that you do the same for all other pves that is for newcomers extremely well traceable