


Hey folks, Peter here.
With the increasing interest to use HSE to put DPS potential and general team play skills to the test we decided to publish a quick guide as to how this map feels to be approached best. It can be separated in two stages.
 (graphic by @reptilecynrik)
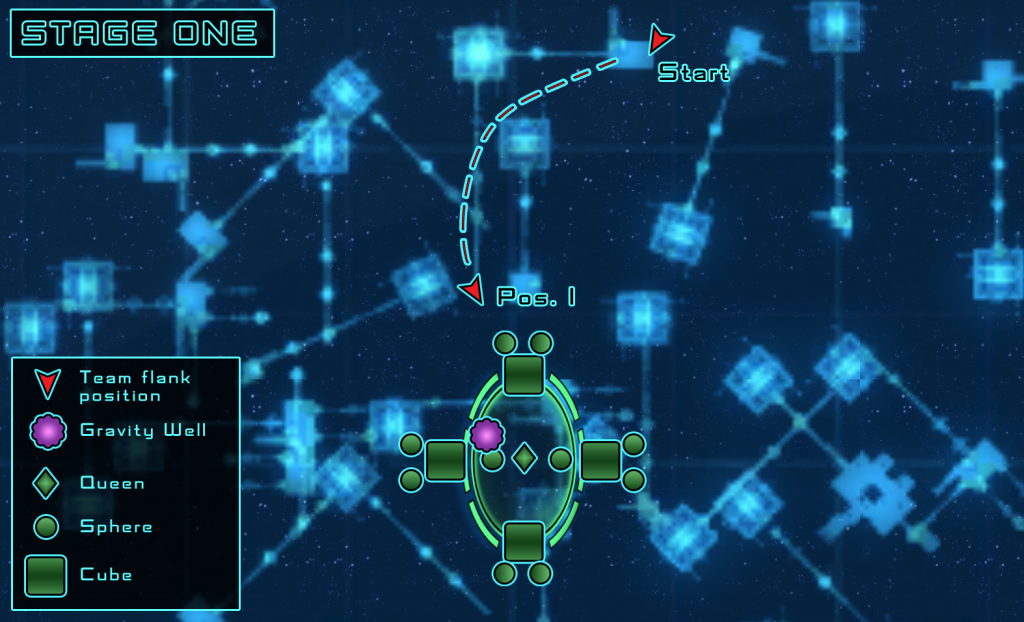
Stage One
The team warps in facing the Hive from the highly useful flanking position so the general side from where to attack is already made clear (Start). The start timer should be used to launch hangar pets, manage +/- threat stance and select cruiser commands. A good way to engage the Hive would be to get into 11-12 km range, come to a hold to refresh power levels, give a “go in 3” command, sync/buff up all abilities and start to fire as a team. Entering the fight one team member at a time at full impulse should be avoided at all cost! We found the displayed angle (Pos. 1) from a slightly high altitude looking down to be optimum as the amount of hit points to melt from here stays up the longest until re-positioning is required.
The jumping of the tac cubes, and thereby exposing of additional cubes is completely random so a general strategy as to how to proceed best through the Hive as in clock- or counterclockwise cannot be made. Given from all record runs so far however the following advice should be on the mind of every individual pilot:
- Keep up the feed of hit points in your arc (CSV: 3) by maneuvering slowly.
- Resist the urge to proceed too fast in the forward direction into the hive as the critters will outflank you easily then.
- Better check sides constantly on the way to proceed forward to hinder cubes and spheres from either escaping or outflanking.
- Stay close to your team! Focus on same targets to share most team-buffs/de-buffs; try to avoid firing on stuff alone.
- Watch constantly if Tac/Intel Fleets are engaged and if not hit them immediately.
- Use area of effect team heals and sustains (interference platform, shield bubble, proto matter console) one team member at a time while proceeding.
While PvE tanks have proven themselves in Silver to Gold ranged DPS groups the only beneficial support activity on this map in Diamond teams seems to be some crowd control. Spheres use EPtE soon after they get attacked. For the most part this can be countered by a sci player who also plays an important role in stage two. Since the critters near Pos. 1 are usually dead within seconds it is best if the crowd controller holds back a bit on his Gravity Well there. Use the time to buff up Sci Fleet, the Romulan reputation clicky as well as any possible EPG chains and try to release it somewhere in the second or third row of the Hive. That way the size of the Gravity Well is likely to include all spheres on the stage, even those in the background and flanks. At the same time the slower EPG damage can do its thing more undisturbed while the rest of the team is still busy with the other critters in front.
 (graphic by @reptilecynrik)
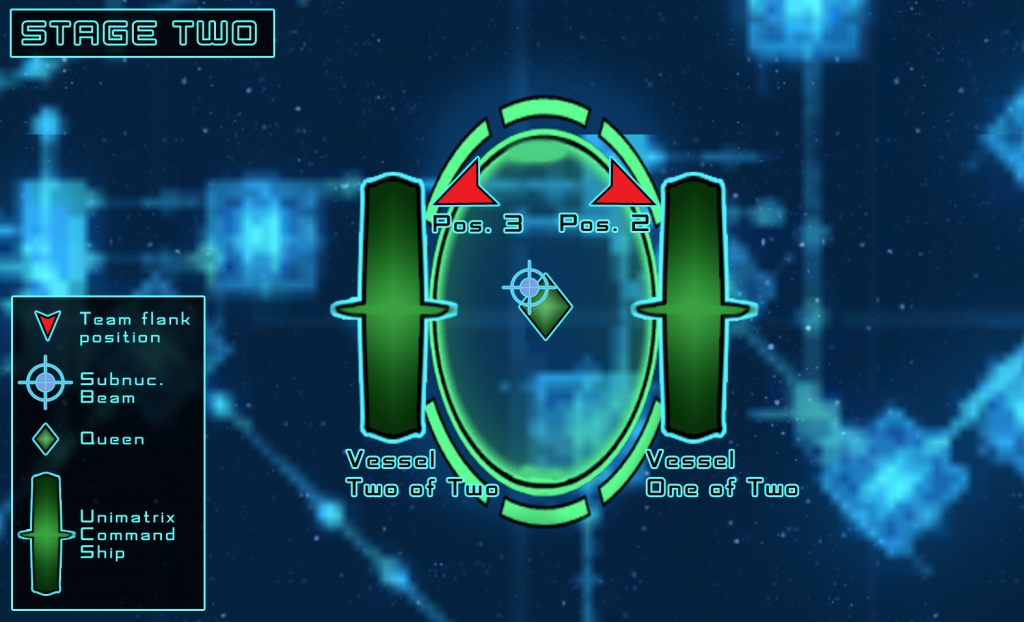
Stage Two
When the last critter has been removed two Unimatrix vessels enter the stage that need to be destroyed next. Now is the time to switch to single target attacks if possible and engage those two ships one after the other. While the respective team position after stage one could decide best which of the two ships to attack first lack of communication and orientation (dense debris) makes it prudent to simply start with vessel ONE of two. The flank positions (Pos. 2 & 3) are very close to one another but also to the angle of the lances so be careful here. In any case all players in team should focus on the same uniship at a time to share buffs & de-buffs again. We have noticed that they often hold back on their Feedback Pulse so with a bit of luck and focus your teams will wipe out a ship before it gets activated. If not either try to use Subnucleonic Carrier Waves from Intel ships or simply hold back with firing a bit and/or spike you’re left over healing abilities.
The sci captain’s ability Subnucleonic Beam must be saved for the Queen! She becomes targetable the second after the last Unimatrix ship is killed. Unlike the latter the Queen can and will use her Feedback Pulse independent of the teams actions so the supportive sci player must be standing by the entire time with his counter. Select the Queen in the HUD for that and wait carefully. Be observant until the Feedback Pulse icon gets displayed and then engage Subnucleonic Beam directly thereafter. In the meantime the rest of the team should position themselves around 5,5 – 6 km away from the Queen to avoid her other potent attacks and get the job done.
Thank you very much for reading and Feli for publishing this article here. Special thanks this time go to my best bud Patrick for making the graphics not to mention doing countless HSE with me. Feel free to discuss the map here and bring up any ideas or input you might have to expand on this quick guide.
Happy shooting all!
-Peter

Amazing work! Guess I’ll have to find a team and try this. On what channels would I find a more suitable team to familiarise myself with this queue?
Hey Casual and thank you very much for the kind words. 🙂
Most players I know favor this map in private teams with friends and with some familiarity towards the other’s play style (sci for subnuc, crowd control, tanks). Nevertheless the HP to melt in Stage One with respect to the timer require 200k team DPS at the moment so every player in Silver (40k+) and upwards can contribute enough to cope with the map.
As a good way to compromise I often see calls in Gold with additional info if skills besides DPS as in tanking or a SCI is present or feels required. As for me I basically love this map in any team constellation or role and hate it if anybody DPS names and shames afterwards. Fortunately few do in our channels and again, every Silver player has earned the “right” to be there game sided as far as I can tell.
If you aim for a DPS record though, clearly a Diamond group without a tank side role is the way to go. Thanks to the colony consoles, voth turrets, protomatter field, energy refrequencer and honored dead one can fortify a ship easily enough without sacrificing DMG too much there.
I currently run 10 toons. 6 tacs, 2 engi and 2 sci. I’m split between phasers, disruptors and torp/exotic builds. Running faw on engi and crf/csv on tacs. So I have a wide range of alts to try and mark some records both on ISA and HSE.
All of the tacs are 50-75k+ dpsers and 100k reaching in ISA. I haven’t found any group to be able to HSE properly yet to test my numbers, but I will.